How To Apply for a US Visa in the Philippines: An Ultimate Guide
With Uncle Sam tightening its immigration policy more than ever before, US visa application can be a nerve-racking experience, especially for first-timers.
It’s not unusual to hear about applicants who entered the US Embassy oozing with the confidence only to come out later with the bad news of rejection.
No less than President Rodrigo Duterte can share his own horror story of having his US visa application rejected .
US visa is, without a doubt, one of the most difficult to obtain among the foreign visas. But is there a way to increase your chances of getting approved?
In this definite guide, we’ll discuss in great detail every step involved in the US visa application, plus tips to boost your chances of getting approved.

Table of Contents
What is a us visa, a. immigrant visas, a. business/tourist visa, b. work visa, c. student visa, d. exchange visitor visa, e. transit/ship crew visa, f. religious worker visa, g. domestic employee visa, h. journalist and media visa, i. treaty investors and traders visa, 2. check if you’re qualified to apply for your chosen us visa, general requirements, supporting documents, other supporting documents (according to us visa type), 4. fill out the us visa online application form, option 1: over-the-counter payment, option 2: online payment, option 1: online, option 2: over the phone, 7. show up at the us embassy on the date and time of your interview, 8. wait for your passport to be released, tips and warnings, 1. do i need to have ‘show money’ when applying for a us visa what is the minimum amount of money that i need to show in my bank account, 2. my visa got denied. what happens next.
- 3. My visa application has been denied. What can I possibly do to reverse the decision?
4. I was found ineligible for a visa. Can I get my money back?
5. when can i re-apply for a us visa, 6. is there a time limit as to when i can re-apply, 7. what could make the consul change his mind and grant my visa on re-application, 8. how can i apply for a us visa for my yaya/caregiver/secretary, 9. how can i apply for a us visa for my baby/infant, 10. how long is the validity of the us visa, 11. i set an appointment with the embassy but made a mistake in my application. what should i do next, 12. i’m a fresh grad with less than php 30k on my bank account. will my visa application be denied, 13. is it possible to be granted a us visa to visit a significant other.
- 14. The validity of a US visa is 5-10 years. With that said, if I renew my passport, will I still have the remaining years of my visa or not?
15. Can anyone recommend a reliable US tourist visa agency to help me get a visa?
16. is it possible to submit a family or group application.
Anyone who wants to go to the US either temporarily (for work/pleasure) or permanently as an immigrant is required to obtain a US visa.
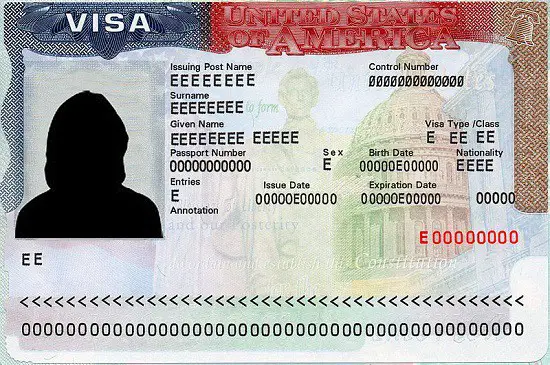
A visa isn’t like your Philippine passport with multiple pages. Rather, it’s an endorsement placed within your passport which proves you can enter, leave, or stay in a foreign country for a specified period of time.
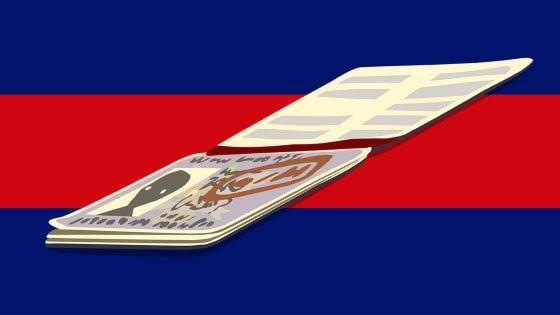
A US visa looks something like this:
It should be noted that citizens from countries that participate in the Visa Waiver Program can travel to the US visa-free.
Unfortunately, the Philippines is not one of them. And for a good reason.
Filipinos with short-term visas have been notorious for overstaying and eventually seeking employment in the US illegally, so much so that we have a colloquial term for them– TNT which is short for “tago ng tago” or constantly hiding from immigration authorities.
US visa is a way for Americans to protect their country not just from illegal immigrants but also from threats of terrorism, human trafficking, and the likes.
If the US Embassy is extremely selective when screening applicants, it’s only because of a lot of Filipinos in the past who betrayed them.
Therefore, Filipinos with an ulterior motive when applying for a US visa must be warned: the US Embassy is always ready to deny your application at the slightest chance they get.
How To Apply for a US Visa in the Philippines in 8 Steps
1. identify the appropriate visa for the purpose of your trip.

There are different types of US visas.
For your application to become successful, ensure that you’re applying for a US visa that aligns with your purpose of traveling to the US.
There’s no point in applying for a tourist visa when the purpose of your trip is to study and possibly get a permanent employment in the US.
In general, US visa has two types: Immigrant visa and Nonimmigrant visa.
Immigrant visas are granted to those who intend to live permanently in the United States.
To apply for this visa, an employer or a family member who is already a US resident or citizen must first submit a petition to the US Embassy or the US Citizenship & Immigration Service (USCIS) on your behalf.
Once granted, you can use the visa to stay in the US as a Legal Permanent Resident and eventually acquire US citizenship.
b. Nonimmigrant visas
By contrast, nonimmigrant visas are issued to specialty workers, tourists, students, and business people who are planning to stay in the United States for a limited period of time.
The following is a list of common nonimmigrant visas:
B-1 and B-2 visas are granted to foreigners who are visiting the United States temporarily.
B-1 is for those who are going on a business trip (e.g., attending conventions/conferences, consulting with business associates, negotiating contracts, etc.). B-2, on the other hand, refers to the “tourist visa” given to those coming to the US for a vacation, family reunion, medical treatment, etc.
While B-1 and B-2 visas differ in terms of purpose, they’re combined and issued as one visa, also known as the B-1/B-2 visa.
A work visa is intended for those who have been petitioned by an employer or agent to work in the United States temporarily.
There are different work visas for different kinds of jobs:
- H-1B (specialty occupation)
- H-2A (seasonal agricultural workers)
- H-2B visa (skilled and unskilled workers)
- H-3 (trainee)
- H-4 (dependents)
- L-1 (intra-company transferees)
- L-2 (dependents)
- O (people with outstanding ability/achievements in sciences, arts, education, business, athletics, motion picture, and television production)
- P (artists and entertainers)
- Q (people who are participating in an international cultural exchange program).
As the name suggests, a student visa is issued to Filipinos who have been approved to study in a legitimate educational institution in the United States.
It comes in two varieties:
- F-1 visa, for those who are pursuing academic studies.
- M-1 visa, designed for those who wish to engage in a non-academic or vocational study/training.
Also known as a J visa, this type of US visa is given to those who have been accepted and approved to participate in exchange programs in the US. An exchange program is designed to promote the interchange of persons, knowledge, and skills in the fields of arts, sciences, and education.
Aside from the principal visa holder (J-1 visa), dependents who wish to accompany him/her for the duration of the trip may also apply for a J-2 visa.
The transit or C visa is used whenever you’re passing through the United States en route to another country. It’s like a tourist visa except that you’re only allowed to stay in the US for a relatively shorter period of time.
Crew or D visa, meanwhile, is designed for the crew members of a ship or an aircraft who will likewise transit or pass through the United States.
In most cases, the crew members use a combination of transit/crew visas (C-1/D). Should they wish to spend more time in the US for vacation or during time-off between flights/cruises, they have to apply for both transit/ship crew visas and the B-1/B-2 visa.
A religious worker who belongs to a recognized religious group or organization may apply for this visa (also known as R visa) to stay in the US temporarily. The visa will allow the religious worker to conduct religious worship and other activities within the limits of his/her occupation.
A domestic employee is defined as a personal or domestic servant who is accompanying or following an employer to the United States.
In this case, the Filipino worker may be eligible for a B-1 visa, regardless of whether the employer is an American citizen or not. If the employer is a government official or a foreign diplomat, the domestic employee may qualify for an A-3 or G-5 visa, depending on the employer’s visa status.
Domestic employees include, but not limited to, nannies, au pairs, valets, chauffeurs, cooks, butlers, housemaids, footmen, gardeners, paid companions, etc.
The media or I visa is for Filipino reporters or representatives of local media who want to travel to the US temporarily to cover news or engage in activities related to their profession.
Because the Philippines is one of the countries that maintain a treaty of commerce and navigation with the United States, Filipinos can travel to the US with an E-1 (Treaty Trader) or E-2 (Treaty Investor) visa.
This visa will allow you to come to the US to invest capital, develop and direct operations of an enterprise you’ve invested in, or carry on substantial trade (including trade in services or technology).
Before getting an appointment with the US Embassy, ensure you have valid reasons for applying for the type of visa you’re aiming for.
The embassy official who will conduct the interview will scrutinize your application and can reject it if you’re unable to prove you have the necessary qualifications.
From this point on, we’re going to focus on the more popular nonimmigrant US visas. If you want to know the qualifications and requirements for the immigrant visa, please refer to this guide .
a. For Business/Tourist Visa: You must prove to the consular officer that you intend to visit the US for a limited period of time by showing proof of funds to cover your travel expenses and solid ties to the Philippines like properties, business, or employment.
b. For Work Visa: To qualify for a work visa, your employer or agent must first file a Petition for Nonimmigrant Worker on your behalf. The petition or Form I-129 must be approved by the US Citizenship and Immigration Services (USCIS).
Upon approval, applicants must present their petition receipt number during the interview at the US Embassy. Take note, however, that having an approved petition doesn’t guarantee visa approval.
For a complete list of work visas and their respective qualification requirements, check out this link .
c. For Student Visa: F-1 and M-1 visa applicants must prove that they’ve been accepted and approved to study in an accredited educational institution in the United States.
Keep in mind, however, that Filipinos (and other foreigners) are prohibited by US law to study in a public elementary school (from kindergarten to 8th grade) or a public adult education program. For more information about US student visas, visit Education USA .
d. For Exchange Visitor Visa: To apply for this visa, Filipinos must first be accepted by an educational institution or a program sponsor in the US who will then provide the applicant with the necessary documents needed for the visa application.
Exchange visitor visa applicants can be one of the following: students, on-the-job trainees, teachers, professors, research scholars, professional trainees (medical and allied fields), etc.
e. For Transit/Ship Crew Visa: To get approved for this visa, you must prove to the consular officer your intention by showing the following: proof of funds to support your transit journey, permission to enter your destination country, and the ticket or other documents that will prove you’re en route to the said destination.
f. For Religious Worker Visa: Filipinos who are interested to apply for this visa must be a member of a tax-exempted nonprofit religious organization (or its affiliate) recognized by the US.
You must be a member of the denomination for at least 2 years prior to the visa application. If you’ve previously spent five years in this category, you must show to the consular officer that you reside or physically present in the Philippines for the immediate prior year.
g. For Domestic Employee Visa: As an applicant, you must prove to the consular officer that you have compelling ties to the Philippines and that you intend to go back to your home country once your contract expires.
You must also secure an employment contract signed by you and your employer. For a complete list of qualifications for a domestic employee accompanying a US citizen or a non-US citizen, please refer to this checklist .
h. For Journalist and Media Visa: To qualify for this visa, you must be a representative (e.g., reporter, editor, film crew, etc.) of a local media and the activity you’ll be doing in the US should be informational in nature like news gathering and reporting.
If you have a spouse or unmarried children less than 21 years old who wish to accompany you on the trip, they may apply for a derivative I visa.
Freelance journalists may also qualify for the media visa, provided that they are under a contract to a media organization, hold a credential issued by a professional journalistic organization, and the content they’re working on isn’t intended for commercial entertainment/advertising.
i. For Treaty Traders and Investors Visa: Click here for a complete list of qualification requirements for E-1 and E-2 visa.
3. Know the US Visa Application Requirements
The requirements listed here are applicable to nonimmigrant US visa applicants. If you’re applying for an immigrant visa, please go here instead.
The consular officer will treat every application as unique. Therefore, the number of requirements that will be requested from you depends on your personal circumstances and the type of US visa you’re applying for.
a. Duly accomplished DS-160 Form or Nonimmigrant Visa Electronic Application Form (more on this later).
b. A valid Philippine passport . The validity date should be at least 6 months beyond your intended period of stay in the US.
c. One 2″x2″ ID photograph which you are required to upload as part of the online application. You should also bring extra copies during the interview in case the consular officer requests for additional ID pictures.
The photo must meet the following criteria:
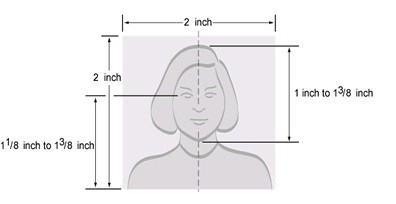
- Must be recent or taken within the last 6 months .
- Your eyes must be open and looking straight toward the camera. They should be anywhere between 1-1/8 inches and 1-3/8 inches (28 mm and 35 mm) or about 60% from the bottom of the photo.
- Must show your head from the top of your hair to the bottom of your chin . Hats, head coverings, and eyeglasses must be removed except if used for religious purposes (hats) or if the eyeglasses can’t be removed for medical reasons, in which case a medical certificate/statement must be provided.
- The entire head should be at the center of the frame . It should measure 1-1-3/8 inches (25 to 35mm), filling between 50% to 70% of the photo.
- The background must be either white or off-white . It must be uncluttered with no shadows either in the background itself or across the applicant’s face.
- Your face must show a relaxed and natural expression .
- The photo must be in color . Black and white photos aren’t accepted.
- You should wear normal clothing or something you wear on a daily basis . Uniforms and camouflage attire aren’t allowed except for religious attire that is worn every day.
d. Receipt showing payment of the USD 160 non-refundable nonimmigrant visa application fee (paid in Philippine pesos).
e. Interview appointment letter c onfirming that you’ve booked an appointment with the US Embassy online.
Update: Aside from the general requirements above, the US Embassy now also requires visa applicants to submit their social media information and all of their previous contact information as part of the visa application process. Applicants are required to submit information on social media accounts that they have used in the past 5 years. This will give the US government access to the applicants’ previously shared locations, photos, dates of births, dates of milestones and other information that can be found on social media profiles. Applicants will also be asked to provide all of their previously used telephone numbers and email addresses, as well as all of their previous and current international travel and deportation status. This requirement has been added for the purpose of checking if the applicant or any of his family members has been involved in terrorist activity.
For nonimmigrant US visa applications, supporting documents will provide strong evidence that the applicant intends to go back to the Philippines at the end of the trip.
Not all applicants will be required to present these documents. In most cases, all vital information that the consular officer needs are already provided in the application form and by the interview itself.
However, supporting documents may not be required only on a case-to-case basis. If your application raises some red flags, the consular officer may request some documents to strengthen your profile.
Hence, it’s better to come to the US Embassy fully prepared for the worst.
In general, supporting documents are classified into two categories:
Proof of funds, which will prove to the consular officer that you are financially capable of carrying out the trip; and Proof of strong ties to the country which provides evidence that you’ll go back to the Philippines after the trip and have no intention of overstaying in the US and live there illegally.
Proof of funds
a. For employed
Show that you can afford the trip and you have a job to go back to by providing the following:
- Certificate of Employment/COE (stating your position, salary, and tenure).
- Recent payslips (usually for the past 3 months).
- Income Tax Return (ITR) for the previous year.
b. For self-employed
The consular officer must see that you’re in good financial standing and that your business/freelance job is stable through the following:
- Business permit or a copy of the official business registration .
- Bank certificates/Bank statement/Book of the company and Financial Reports from the past 3 months.
- Tax statements and/or tax-paying certificate.
c. For students or minors
- Certification from the school or educational institution providing the grant (for US student visa), showing the specific details of the scholarship .
- Sponsorship letter from parents/legal guardians with attached proof of their solvency or financial capability to cover the expenses of the trip.
d. For retirees
- Business permits and other requirements for self-employed, if applicable.
- Evidence of pension (e.g., receipts).
- Financial assets and proof of investments.
- Retirement certification.
e. For unemployed
- Sponsorship letter with proof of the sponsor’s solvency.
- Copies of bank statements, bank certificates, and personal credit cards from the past 3 months.
f. Additional proof of funds
If you want to increase your chances of getting approved, you can also try the following suggestions:
- Especially if you’re a freelancer or self-employed, it doesn’t harm to add a sponsor even if you can afford the trip. This sponsor doesn’t necessarily need to cover your expenses. If anything, he/she can serve that role only on paper. The goal, after all, is to strengthen your application in any means possible.
- Provide proof of accommodation by making hotel reservations on websites like Agoda which offer free cancellation. You can also show your return tickets to prove you’re scheduled to go back to your home country after the US trip.
Proof of strong ties to the country
Proof of strong ties shows that you have enough and compelling reasons to return to the Philippines after your trip to the United States.
The US Embassy uses this to prevent the proliferation of illegal immigrants in the United States. Requirements under this category vary depending on the applicant’s financial resources, travel plans or history, and personal circumstances.
- Leave of absence.
- Certificate of Employment.
- A letter from you explaining the reasons why you won’t overstay.
- Business registration .
- Scheduled business meeting or company events that you’ll attend upon return, if applicable.
- Land title and other proof of properties/real estate you own.
- A letter from you detailing the reasons why you won’t overstay.
- School enrollment certificate.
- A letter from you and your parents/legal guardians explaining the reasons why you won’t overstay.
e. For the unemployed
- A contract/job offer from the company you’ll be working for in the Philippines, if applicable.
- A letter from you explaining the reasons why you won’t overstay. Valid reasons may include opening a business, enrolling in a school, etc. (with authentic documents to support them).
Ensure that all documents you’ll bring are authentic. Submitting fake documents will result in permanent ineligibility to apply for a US visa. If confidentiality is a concern, put all documents in a sealed envelope.
While you can’t predict which supporting documents will be asked from you, it’s better to bring as many of them as you can to show the consular officer that you didn’t come unprepared.
Depending on the type of US visa you’re applying for, you may be required to bring other documents apart from those already mentioned above.
For quick reference, here’s a list of different US visas and links to their specific requirements we might have missed:
- Business/Tourist Visa
- Student Visa
- Exchange Visitor Visa
- Transit/Ship Crew Visa
- Religious Worker Visa
- Domestic Employee Visa
- Journalist and Media Visa
All nonimmigrant US visa applicants regardless of age are required to accomplish and submit a Nonimmigrant Visa Electronic Application (DS-160) form.
There are two reasons why.
First, you can’t set up an appointment with the US Embassy without the alphanumeric barcode number which is only generated once you’ve completed the DS-160 form.
Lastly, you won’t be allowed to enter the US Embassy for the interview without the printed DS-160 confirmation page. Handwritten or typed applications will not be accepted.
I can’t mention enough the importance of the DS-160 form. As a matter of fact, some Filipinos get rejected by providing incomplete or inaccurate information on this form.
In case you need help in filling out the form, please consult a translator or an immigration lawyer. If you’re ready to complete the DS-160 form, please follow the procedure below.
Prepare the requirements/information that you will need for the completion of the DS-160 form.
- Soft copy of your ID picture (see step 3)
- Résumé or Curriculum Vitae (for information regarding your education and employment history)
- International travel history/dates of your last five trips to the United States, if applicable
- Travel itinerary, if you’ve already made travel arrangements
- Other information specific to the US visa you’re applying for. For students and exchange visitors, for example, you will be asked to provide the school address and your SEVIS ID, both of which can be obtained from your I-20 or DS-2019 form.
Access the DS-160 form online
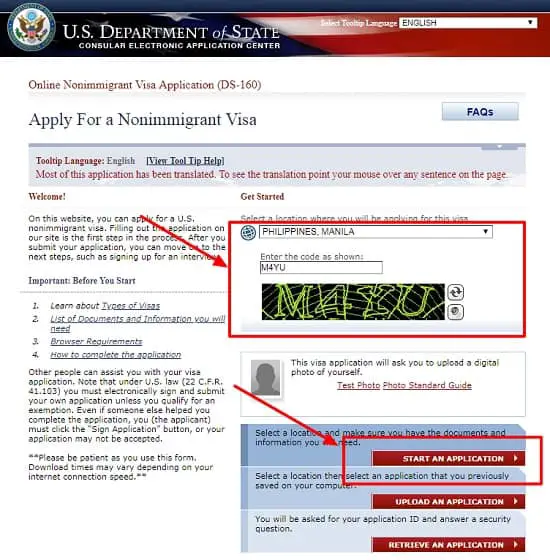
To get to the DS-160 form, go to the Consular Electronic Application Center website.
In case you’re having difficulty accessing the page, try switching your browser to either Firefox or Internet Explorer.
If the page is displaying correctly, go ahead and select your location (i.e., Philippines, Manila), enter the captcha code provided, and click “Start An Application.”
Complete the DS-160 form by providing all requested information
Ensure all your answers are complete, accurate, and written in English.
If you want a preview of the type of questions that will be asked in the application form, click here . Expect the DS-160 form to be comprehensive with questions falling under the following categories:
- Personal information (e.g., name, gender, marital status, address, contact information, passport information, etc.)
- Travel information (e.g., the purpose of your trip, travel companions, previous trips to the US, etc.)
- Family information (e.g., details about your parents, spouse, etc.)
- Work and education history
- Security and background (e.g., any mental/physical disorder or communicable disease you’re currently afflicted with, criminal background, etc.)
Upload your ID photo
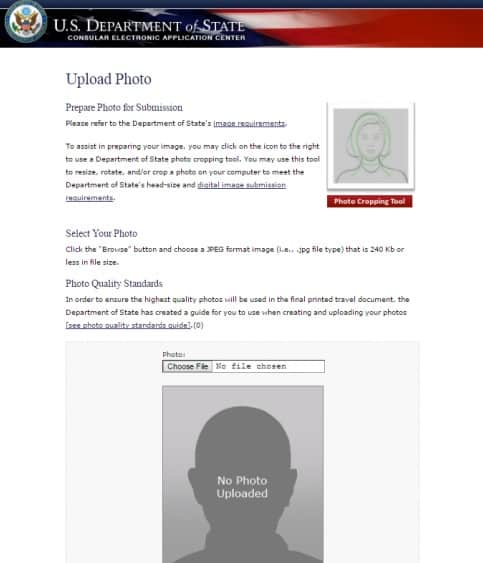
Ensure the photo has the right size and follows the specifications required by the US Embassy. For more information, see step 3 of this guide.
Review your application before submitting it.
The system will give you an opportunity to review all the information you’ve provided before submitting the form.
Make sure that they’re all complete and accurate as you won’t be able to change anything once the DS-160 form has been submitted.
If you’re confident about your application, enter your passport number and the captcha code provided. These will serve as your E-Signature.
Finally, click “Sign and Submit Application.”
Print your DS-160 confirmation page
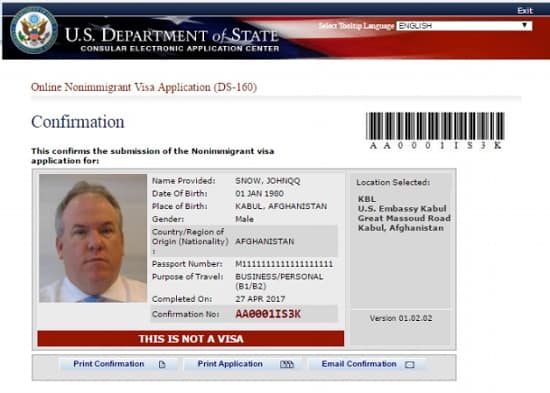
All applicants are required to bring the printed confirmation form to the US Embassy during their scheduled interview. The alphanumeric barcode number located on the upper right corner of the page will enable the consular officer to retrieve your DS-160.
Without this confirmation page, you will not be allowed entry to the US Embassy and your application will be automatically forfeited.
It is also recommended to keep a backup copy of your duly accomplished DS-160 form in case things go awry. To secure a copy, simply hit the “Back” button on your browser and then email yourself a copy of the form in PDF format.
Additional reminders related to the DS-160 form:
- Only use letters in the English alphabet. Hence, if your name contains “ñ” as in the case of “Niña,” you must spell it using the equivalent letter in the English alphabet (i.e., Nina).
- While filling out the DS-160 form, always click the “Save” button or download the unfinished form to your computer. Otherwise, you can potentially lose all the data you’ve provided as the page “times out” after 20 minutes of inactivity.
- Every time you complete a page in the application, it is automatically saved so you don’t have to worry about losing the data when the Internet connection is interrupted. You can also save a partially completed application in case you want to run some errands. To continue where you left off, simply return to the Consular Electronic Application Center website and click “Retrieve an Application.” You will then be asked to enter your application ID number and answer the security question.
- In case you want to take more time, you can also download your incomplete application to your personal computer. Return to the website within the next 30 days and then select “Upload an Application.” Follow the instructions to resume the application.
5. Pay the US Visa Application Fee
At this point, you’re only one step away from scheduling an appointment with the US Embassy for your interview.
To book an interview, you must first pay a non-refundable, non-transferable Machine Readable Visa application fee (or MRV fee).
All US visa applicants are required to pay this fee. This is because the online appointment will ask for the receipt number (proof of payment) before you can move forward.
The amount of MRV fee depends on the type of US visa you’re applying for and the current US dollar to the peso exchange rate. To view the list of US visa types and their corresponding application fees, please go to this page .
As of this writing, the most common types of US nonimmigrant visas like the tourist visa cost $160 whereas petition-based visas like religious and work visas require an application fee of $190 .
Meanwhile, the most expensive US visas are the K visa (Fiancé(e) or Spouse of US Citizen) and the E visa (Treaty Trader/Investor) with application fees amounting to $265 and $205, respectively.
To pay the US visa application fee, you can choose from two modes of payment: Over-the-counter or online transactions.
If you choose this method, you can pay the visa application fee in cash at any BPI (Bank of Philippine Islands) branch near you.
To make a payment, you need to present a printed copy of your US visa application deposit slip. You can find the deposit slip on this page .
Apparently, there’s a unique deposit slip for each application fee. Choose and print the deposit slip that corresponds to the cost of your US visa application fee.
The deposit slip is valid for a single transaction. It also has an expiration date so make sure you make the payment before it becomes invalid. In case it expires, you can generate another deposit slip by returning to the page I’ve mentioned and re-clicking the link to the deposit slip.
After making the payment, ensure you keep the receipt as you’ll be needing the receipt number to schedule an appointment.
For a faster and more convenient way of paying the MRV fee, you can use either the BPI or Bancnet online bill payment services.
If you have an account with either of the two, you can quickly pay the fee without going to the bank.
To make the payment, simply go to the BPI or Bancnet website. For this transaction, you will be asked to provide a reference number:
- 48160628 (for BPI customers)
- 35887923 (for Bancnet customers)
For complete instructions on how to pay the US visa application fee online, please refer to the following guides:
- How to Pay US Visa Application Fee Online with BPI
- How to Pay US Visa Application Fee Online with Bancnet
Avoid making lump-sum payments when paying for your family or a group of applicants. Instead, make the payments individually to generate a unique receipt number for each applicant which is needed to secure an appointment with the US Embassy.
Once the payment has been accepted, you’ll then receive an email confirmation which you need to print and bring to the US Embassy on the day of your appointment.
6. Schedule an Appointment With the US Embassy for Your Visa Interview

After paying the visa application fee, it’s important to know that you can’t schedule an appointment right away.
Depending on the mode of payment you used, it may take anywhere between four hours to a whole day before you can make an appointment.
For over-the-counter bank transactions, you can already book an appointment/interview after four hours from the time of payment.
Online payments, on the other hand, may take longer depending on the time of payment and whether you used BPI or Bancnet for the transaction.
The tables below summarize their processing times and exactly when you can schedule an appointment:
For online payments made with BPI

For online payments made with Bancnet

After the waiting period has passed, you can now schedule an appointment.
There are two ways to secure an appointment with the US Embassy: online via the US Department of State’s Bureau of Consular Affairs website or over the phone with the help of a customer service representative.
To schedule an appointment online, you must first ensure that you have the following information on hand:
- MRV fee payment receipt number
- Passport number
- The ten-digit barcode number in your DS-160 confirmation page
Once you’re ready, go to the US Department of State’s Bureau of Consular Affairs website and register/create an account.
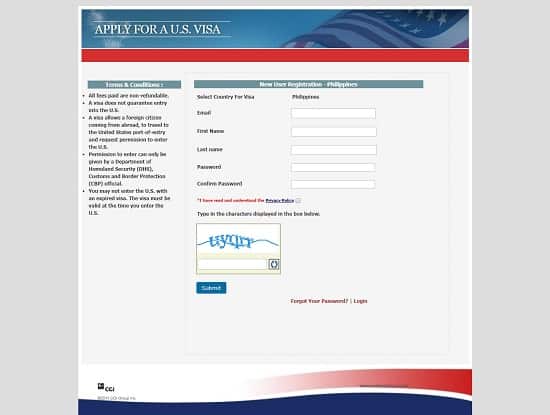
After creating an account, log into the system and click “Schedule Appointment” on the left-hand side menu.
On the succeeding pages, you will be asked to provide vital information like the visa type you’re applying for, personal data, DS-160 confirmation number, names of your family members (in case you’re traveling with them), how you prefer to receive the passport, visa payment confirmation, and the appointment schedule.
Take note that you can’t book an appointment unless you’ve already paid the visa application fee and completed the DS-160 form. This is also the reason why I’ve included them in the earlier steps.
Alternatively, you can ask for the assistance of a customer service representative to book an appointment.
The call center is available during weekdays, from 8 AM to 8 PM, except during the Philippine and US holidays. You can talk to the agent either in English or Tagalog, whatever is comfortable for you.
Here are three ways to talk to a customer service representative directly:
- Telephone: (02)5488223 or (02)7928988
- Web call: If you’re using Firefox, Google Chrome, Safari11 or Opera, you can call directly through your browser by clicking the green button on this page .
- Skype: Please add ustraveldocs-philippines to your list of Skype contacts.
Additional reminders regarding appointment scheduling:
- Choose the earliest schedule to avoid getting stuck in traffic and the long queues.
- Plan your visa application carefully as you’re only allowed to reschedule twice (excluding the initial appointment). If you cancel your second rescheduling attempt again, you’ll be barred from making a new appointment for the next 90 days.
We’ve finally arrived at the most critical part of your US visa application: the dreaded interview.
In this section, I’ll give you an idea what to expect on the day of your appointment.
For tips and strategies to pass the US visa interview, please refer to this guide where I’ve compiled all the insights from some Filipinos who survived the interview and got their visas approved.
Before heading to the US Embassy, make sure you bring all the requirements needed for your US visa application (see step 3 of this guide for the complete list).
Arrive at the US Embassy at least 30 minutes before your scheduled interview. If possible, bring a companion with you who will keep your phone, camera, laptop, and other electronic devices, all of which are prohibited inside the Embassy.
Upon arrival, you will be subjected to initial security checks. Applicants will fall in line to have their bags and requirements checked by the security personnel.
Afterward, you will be directed to another queue where you’ll wait for your turn to undergo the following procedures:
- Pre-Screening : In this step, a consular officer may ask you a few questions regarding your application such as the visa type you’re applying for, the purpose of the trip, and personal data like your name, birthday, and marital status. They may also request additional photos so make sure you have extra copies of your ID picture just in case.
- Fingerprinting : A consular officer assigned in this station may ask you to provide your passport and state your name and birthday. Then, you’ll be instructed to place your fingers on the fingerprint scanner one by one to get your biometrics.
- Interview : The last step is also the most important one. After waiting for your turn, you will be assigned to an interview window where a consular officer will assess your visa application using your answers to the DS-160 form and the interview questions. On average, the interview may last for a few minutes but it can be relatively quick if you have a strong application. For a list of commonly asked questions during the US visa interview, please go to this link.
After the interview, you’ll get an immediate feedback whether your US visa application has been approved or denied.
For successful applicants, expect your passport to be issued after 5 working days.
Passports of approved applicants are released at the chosen 2GO branch. You’ll receive a text message from 2GO once your passport is available for pick-up at the specified 2GO location.
In case you’ve changed your mind and want to pick up your passport at another 2GO branch, you only have until midnight on the day of your interview to update the Documentation Delivery Instructions (see step 6).
To claim your passport, you need to present a government-issued ID.
- All applicants, regardless of age, are required to show up at the US Embassy for the visa interview. Minors (17 years old and below, unmarried) must be accompanied by at least one parent or a legal guardian.
- Only bring original, authentic documents. In the case of government-issued IDs, make sure they’re valid and not expiring anytime soon. Submitting fake documents will not only get your visa application denied but may also permanently ban you from applying for any US visa in the future.
- When it comes to submitting documentary requirements, it’s better to overdeliver. While a lot of applicants who got approved can attest that the consular officer didn’t even bother to ask for supporting documents, remember that visa applications are approved on a case-by-case basis. The more requirements you can bring, the better prepared you will be in case the consular officer request additional evidence to strengthen your application.
- Filipinos who are well-traveled are more likely to get approved for nonimmigrant US visa compared to those who don’t have extensive travel history. By showing your passport stamps, travel tickets, or bookings, you’re making a positive impression to the consular officer that you always come back to the Philippines every time you travel overseas.
- Arrive at the US Embassy 15 to 30 minutes before your scheduled interview. Take note that this applies to all applicants, regardless if you picked an earlier schedule or not. It doesn’t make sense to go there at 6 AM when your schedule is still at 9 AM. Remember, they don’t accommodate applicants on a first-come, first-served basis. The US Embassy prioritizes applicants who have secured an early schedule, not those who arrived at the gate early.
- You have a better chance of getting your visa application approved if you’re applying with your family, especially if you already have previous travel experiences together . While there’s no concrete explanation for this, it is probably because a family of three or four are less inclined to overstay their welcome, especially if all of them have strong ties to the Philippines.
- Pregnant women who will be traveling to the US on tourist visas and with the intention of giving birth so their babies will be granted birthright citizenship will now be treated as foreigners coming to the US for medical treatment. This means that the applicants must prove that they are coming to the US for medical treatment and have the means to pay for it. The new visa restriction is designed to limit the popular practice known as “birth tourism”, which, although considered fundamentally legal, has led to the proliferation of birth tourism agencies, some of which have been arrested for visa fraud or tax evasion.
Frequently Asked Questions
3. my visa application has been denied. what can i possibly do to reverse the decision.
It varies depending on the consul that will be assigned to handle your application. It can be a Single-Entry or Multiple-Entry Visa. Therefore, the validity of the visa ranges from 3 months up to 10 years.
First, fill out a new application form and make sure that all the information you’ve provided is correct. Then, you should call the hotline of the US Embassy where you’ve set your appointment and explain your situation. Provide the application number of the new form that will then replace the old one with errors.
If you’re a minor, then you can use your parents’ credentials and bank statements when you apply for a visa. But if you’re no longer a minor, then your own credentials will be assessed.
Your application will most likely be denied but you can improve your chances by gathering evidence of ties to the Philippines for a couple of years. Once you have done that, then you can apply for a US visa. To increase your chances of getting an approved visa, do the following:
- Get a good job and stay long enough for it to be considered as a long-term job. This is to increase your salary and to prove that you have ties to your country.
- Travel as much as you can to other countries. If you have an impressive travel history, it will increase your chances of getting approved for a visa.
If you really want to apply for a visa now and you’ve been to the US before, as well as other countries, then you can give it a try. To improve your chances and prove that you will definitely come back to your home country, mention future plans like going to graduate school, starting a business, or anything like that.
If your parents will sponsor your trip, you can consult a lawyer and draft an Affidavit of Support that you can present to the consul. Make sure to bring all the necessary documents to support your application like you and your parents’ bank statements and titles.
Unfortunately, your chances are slim if ‘visiting a significant other’ will be your reason for going to the US. All the red flags are there if you are single and have a US citizen partner.
If you’re already engaged, then you can apply for a different visa category instead. On the other hand, if you have a child together, then you can try the Family Reunification approach.
You can increase your chances of getting an approved visa if you have a stable job in your country, have an impressive travel history, and a good amount of savings.
14. The validity of a US visa is 5-10 years. With that said, if I renew my passport , will I still have the remaining years of my visa or not?
Yes, your visa will still be valid even if you change your passport.
According to the US State Department website, you just have to bring your old passport with you when you travel to the US. You can even purchase a passport jacket that can hold both your old and new passports together so it’ll be more convenient to bring them with you during your travels.
You don’t need to look for a reliable agency to process your visa for you.
Getting the services of an agency will not improve your chances of getting approved . The agency’s only role is to apply on your behalf.
In order to increase your chances of getting your visa application approved, you only have to show that you have substantial ties to the Philippines like a stable and high-paying job, properties, investments, money in the bank, and family.
Yes, you can submit your applications together as a family or as a group.
On your ‘Confirmation’ page, click ‘Email Confirmation’. You’ll be redirected to a ‘Thank You’ page where you will see an option to create a family or group application.
Applicable information from your application will automatically be imported when you create a new application. It must be noted that even though it will be a family or group application, you’ll still need to create an individual application for each family member or individual.
Read our other travel visa guides:
How to Get Japan Visa in the Philippines: A Complete Guide for First-Time Tourists
How to Get Korean Visa in the Philippines: A Complete Guide for First-Time Visitors
How to Apply for Schengen Visa: An Ultimate Guide for Philippine Passport Holders
How to Apply for an Australian Tourist Visa: A Complete Guide for Filipino Tourists
Written by Luisito Batongbakal Jr.
in Juander How , Travel and Leisure
Luisito Batongbakal Jr.
Luisito E. Batongbakal Jr. is the founder, editor, and chief content strategist of FilipiKnow, a leading online portal for free educational, Filipino-centric content. His curiosity and passion for learning have helped millions of Filipinos around the world get access to free insightful and practical information at the touch of their fingertips. With him at the helm, FilipiKnow has won numerous awards including the Top 10 Emerging Influential Blogs 2013, the 2015 Globe Tatt Awards, and the 2015 Philippine Bloggys Awards.
Browse all articles written by Luisito Batongbakal Jr.
Copyright Notice
All materials contained on this site are protected by the Republic of the Philippines copyright law and may not be reproduced, distributed, transmitted, displayed, published, or broadcast without the prior written permission of filipiknow.net or in the case of third party materials, the owner of that content. You may not alter or remove any trademark, copyright, or other notice from copies of the content. Be warned that we have already reported and helped terminate several websites and YouTube channels for blatantly stealing our content. If you wish to use filipiknow.net content for commercial purposes, such as for content syndication, etc., please contact us at legal(at)filipiknow(dot)net
Security Alert May 17, 2024
Worldwide caution, update may 10, 2024, information for u.s. citizens in the middle east.
- Travel Advisories |
- Contact Us |
- MyTravelGov |
Find U.S. Embassies & Consulates
Travel.state.gov, congressional liaison, special issuance agency, u.s. passports, international travel, intercountry adoption, international parental child abduction, records and authentications, popular links, travel advisories, mytravelgov, stay connected, legal resources, legal information, info for u.s. law enforcement, replace or certify documents.
Tourism & Visit
Study & Exchange
Other Visa Categories
U.S. Visa: Reciprocity and Civil Documents by Country
Share this page:
U.S. Embassy Manila, Philippines - MNL
Please follow the steps below before your immigrant visa interview at the U.S. Embassy in Manila, Philippines.
Step 1: Complete your pre-interview checklist
It is important that you bring all required original documents to your interview. Please print the checklist below and bring it to your interview along with the listed documents.
Pre-Interview Checklist >>
Step 2: Schedule a medical exam in the Phillippines
As soon as you receive your appointment date, you must schedule a medical exam in the Philippines. Click the “Medical Exam Instructions” link below for instructions.
Medical Exam Instructions >>
Step 3: Register your delivery address online
Registering your address provides us with the information we need to return your passport to you after your interview. Registration is free. Click the “Register” button link to register.
If you want to cancel or reschedule your visa interview date, you will be able to do so after you register your delivery address.
Register >>
Step 4: Review interview guidelines
Read our interview guidelines to learn what to expect at the interview.
Interview Guidelines >>
Pre-Interview checklist
Every applicant must bring the following documents to the immigrant visa interview:
A copy of your NVC interview letter (does not apply to Diversity Visa, fiancé(e), adoptive, or asylee/refugee applicants).
A passport valid for six months beyond your intended date of entry to the United States.
The Confirmation page from the Form DS-260 Application for an Immigrant Visa you submitted online at ceac.state.gov/ceac .
Your original birth certificate and English translation (if applicable). For Philippine born applicants, you should obtain this from the Philippine Statistics Authority (PSA) – the central repository of Philippine civil documents. If born outside the Phillippines, you must bring the birth certificate from the country of birth.
Original birth certificates from PSA for all children accompanying the principal applicant .
If you are 16 years of age or older: The original police certificate from your country of current residence and countries of previous residence:
- NOTE : The Embassy requires a Philippine Police Certificate known as a National Bureau of Investigation (NBI) Clearance that is valid for one (1) year from the date it was obtained. You should get a Record Clearance (for travel purposes) from the National Bureau of Investigation (NBI). You may request NBI directly submit your NBI clearance to the US Embassy (recommended) here: clearance.nbi.gov.ph ( if you're having trouble loading this website, try using a different Internet browser )
- The applicant should request an NBI Clearance with an AKA including the applicant’s maiden name, birth certificate name, maiden name and any aliases or nicknames used, including different spellings that may appear on your other documents (birth certificate, marriage certificate, etc.) even if the applicant has never used those names or spellings in regular life.
- Police Clearance from other countries: Applicants who have stayed for one (1) year or more upon reaching the age of 16 years are required to obtain a police certificate. Country-specific information on how to secure foreign police certificates is available at travel.state.gov/content/travel/en/us-visas/Visa-Reciprocity-and-Civil-Documents-by-Country.html
If you have served in any country’s military: Military records with English translation (if applicable).
Applicants who fall into any category below should bring these additional documents:
For all immediate relative and family-based visa applications (CR1/IR1, CR2/IR2, IR5, F1, F2A, F2B, F3, F4):
The appropriate Form I-864 Affidavit of Support for each financial sponsor along with a photocopy of the sponsor’s most recent IRS transcript, or most recent tax return and any relevant W-2s, if the transcript is unavailable.
Proof of your U.S. petitioner’s status and domicile in the United States (photocopy of a U.S. passport, naturalization certificate, or lawful permanent resident card).
Evidence of the relationship between the petitioner and visa applicant (such as photographs, letters, or emails).
- For K1, F2A spouse, and CR1/IR1 petitions: If your petitioner was born in the Philippines and lived at least one (1) year in the Philippines after the age of 18 –A Certificate of No Marriage (CENOMAR) from the PSA valid within one (1) year from the date it was obtained.
- For K1, F2A spouse, and CR1/IR1 petitions: If your petitioner was born in the Philippines and lived at least one (1) year in the Philippines after the age of 18 –A Certificate of No Marriage (CENOMAR) from the PSA valid within one (1) year from the date it was obtained.
If you were previously married, provide proof of termination of previous marriage/s: A Certificate of No Marriage (CENOMAR) from the PSA indicating the annulment or termination, your original divorce or annulment/presumptive death court records , and/or death certificate from the country where the celebration or occurrence took place, with English translation (if necessary). You may request PSA c submit these documents directly to the US Embassy ( recommended ) here: https://www.psaserbilis.com.ph/Default.aspx .
For IR5 and F4 petitions : An original birth certificate from PSA for your petitioner to verify the parent/child (IR5) or sibling (F4) relationship. If your petitioner was born outside the Philippines, you must bring the original birth certificate from their country of birth and its translation (if applicable). If you are the petitioner’s stepchild: The marriage certificate of the petitioner and your biological parent, with English translation. If the marriage was celebrated in the Philippines—an original copy of the marriage certificate from PSA.
If you are adopted: Adoption papers or custody documents including a declaration of finality, with English translation.
For all employment-based visa applications (E2, E3, EW):
A notarized job offer letter stating a salary that meets the local prevailing wage from your U.S. employer dated less than one (1) year ago and a photocopy.
For E2, E3 applicant nurses :
- An original of your valid visa screen and a photocopy.
- NCLEX passers should include certification of which state they are registered in and a photocopy.
For E2, E3 applicant physical therapists: An original of your Foreign Credentialing Commission on Physical Therapy (FCCPT) and a photocopy.
- Applicants who have already passed their National Physical Therapy Exam (NPTE) should include an original of their results and a photocopy.
back to top
Medical Exam Instructions
All immigrant visa applicants, regardless of age, require a medical examination prior to the issuance of a visa. It is your responsibility to schedule a medical exam with St. Luke’s Medical Center Extension Clinic two weeks before your visa interview at the U.S. Embassy. Medical examination results from other physicians will not be accepted. Prior to your visit, you are also encouraged to register online with SLMCEC. Registering online will save processing time and make your visit to SLMCEC faster and more efficient.
St.Approved Physicians: St. Luke’s Medical Center Extension Clinic 1177 J. Bocobo St. Ermita, Manila Tel: (+632) 8521-0020 or (+632) 8521-8647
Items to bring to your medical examination
The doctor will need the following items to complete the medical exam forms:
- Your visa interview letter,
- Your passport,
- Three (3) recently taken passport-sized color photographs, and
- A copy of your immunization records, and
- DS-260 confirmation page.
All medical examination fees, including x-ray and blood test fees, must be paid directly to SLMCEC. Refer to the SLMCEC website for information regarding the medical examination fees.
During the medical exam
The medical examination will include a medical history review, physical examination, chest X-ray, and blood tests (for applicants 15 years of age or older). The United States also requires tuberculosis (TB) testing for all applicants two years of age and older and gonorrhea testing for all applicants 15 years of age and older. Please be prepared to discuss your medical history, medications you are taking, and current treatments you are undergoing. More information on general medical requirements for U.S. immigrants is available on CDC web page .
U.S. immigration law requires immigrant visa applicants to obtain certain vaccinations prior to the issuance of a visa. Current immigrant visa vaccination requirements are available at CDC web page . You can also read Frequently Asked Questions about our medical examination requirements online .
After the medical exam
When your examination is completed, the doctor will provide you with exam results in a sealed envelope or send them directly to the U.S. Consulate. IF GIVEN AN ENVELOPE TO CARRY TO YOUR INTERVIEW, DO NOT OPEN THIS ENVELOPE . Instead, bring it to your visa interview. Any x-rays taken will be given to you. You DO NOT need to bring the x-rays to your visa interview unless you suffer from tuberculosis (TB). However, you must carry the x-rays with you when you travel to the United States for the first time. The medical report must be less than six months old when you enter the United States as an immigrant.
In some cases, the SLMCEC will direct the applicant to engage in subsequent testing, requiring rescheduling of the original visa appointment. You must follow the guidance from the medical provider and will not be admitted if this is the case. SLMCEC does have the authority to provide this guidance to applicants; following this guidance and not appearing for your interview is the correct course of action and will not adversely affect your visa case.
Interview Guidelines
Rescheduling or cancelling your interview
Failure to bring all required documents could lead to significant delays to getting a visa. Applicants who cannot complete the required documents checklist, or who know beforehand that they are unable to keep their appointment, should reschedule. You may reschedule the appointment by visiting the Embassy’s online service or calling (+632)7792-8988 or (+632)85488223. There is no cost to reschedule your visa interview appointment. There is no cost to reschedule your visa interview appointment.
Security screening procedures
Visitors are not permitted to bring the following into the U.S. Embassy and will be denied entry if carrying:
- Mobile phones or any kind of electronic or battery-operated devices such as smart watches, fitness trackers, cameras, computers, gaming devices, USB thumb drives, etc.
- Any device with an on/off switch.
- Outside food or drink (unless medically required).
- Large bags/purses -- only bags that can be hand carried are permitted.
- Sealed envelopes or packages.
- Lighters, matches, or flame-generating devices.
This list is not exhaustive. Consular clients should leave these items at home or another safe location away from the Embassy. There is no storage at the Embassy, and the Embassy has no affiliation with any third-party commercial storage option in the area.
Accompanying persons
Attorneys are not permitted to accompany clients into the waiting room or to their interview. The following persons may accompany a visa applicant to their interview:
- Applicants may bring ONE interpreter if they do not speak English or Filipino well enough for an interview.
- Applicants may bring ONE person to help if they are elderly, disabled, or a minor child.
Immigrant visa fees
If you have not paid all required fees to either the National Visa Center or via the appointment website, please be prepared to pay these fees on the day of your interview. All fees may be paid in either U.S. dollars or the Philippine peso equivalent. We accept cash and credit cards only. Please note that if you are found ineligible to receive a visa, the application fee cannot be refunded. A complete list of fees can be found TSG .
Do not make travel plans outside of Philippines
If your visa is approved, we will keep your passport at the embassy while we prepare your immigration packet (if applicable) and print a visa for your passport. We will return your passport to you later via courier services only. If you have to travel within the Philippines while your passport is still with us, please make sure you have a valid picture ID other than your passport.
Register your passport for return delivery BEFORE your interview
To register your visa packet delivery address, please contact the Visa Information and Appointment Service online or through the call center. Website: http://www.ustraveldocs.com/ph/ph-iv-documentdelivery.asp Call Center (Monday through Friday, 8:00 a.m. to 8:00 p.m.):In the Philippines: (+632)-7792-8988 or (+632)-8548-8223
From the U.S. Mainland: 703-520-2235. If you do not take this step your passport will be considered abandoned and you risk losing eligibility for a visa.
After Your Visa Interview
A consular officer can make a decision on a visa application only after reviewing the formal application and interviewing the applicant. There is no guarantee that you will receive a visa. Do not sell your house, car, or property, resign from your job or make non-refundable flight or other travel arrangements until you have received your immigrant visa.
If more information is needed
Sometimes a Consular officer is unable to make a decision on a visa application because he/she needs to review additional documents or the case requires further administrative processing. When additional documents are requested, the Consular officer will give you a refusal letter that asks you to submit additional documents. The letter will include instructions on how to send those documents to the Embassy. Administrative processing takes additional time after the interview. and varies based on the circumstances of each case. Please wait at least 60 days after your interview before inquiring about the status of administrative processing.
What happens after visa approval
Passport, Visa, and Sealed Immigrant Packet – We will place your immigrant visa on a page in your passport. Please review your visa to make sure there are no spelling errors. We will also give you a sealed envelope containing documents that you must give to U.S. immigration authorities when you arrive in the United States for the first time. Do not open this envelope. You must carry it with you; do not put it in your checked luggage . If you receive X-rays during your medical examination, carry those with you and give them to the U.S. immigration authorities.
USCIS Immigrant Fee – All individuals who are issued immigrant visas overseas must pay a $220.00 Immigrant Fee to U.S. Citizenship and Immigration Services (USCIS) prior to traveling to the United States. This fee is for processing your residency status and printing your Permanent Resident Card. The only people exempt from paying this fee are: children entering the United States under the Hague Process, returning residents, and people traveling on a K visa.
When You Should Travel – You must enter the United States before the expiration date on your visa, which is usually six (6) months from the date of printing. Your visa cannot be extended and all fees are nonrefundable. The principal applicant must enter before or at the same time as other family members with visas. Unless they are eligible for benefits under the Child Status Protection Act, children who are issued a visa before turning 21 years of age must enter the United States before their 21st birthday to avoid losing their immigrant status.
Getting a Green Card – Your Form I-551 Permanent Resident Card, also known as a green card, will be automatically mailed to the address in the United States that you write in your visa application form. This is a very important document that proves you have permission to reside in the United States. If you plan to travel outside the U.S. before your green card arrives: Please consult USCIS’s and CBP’s websites for rules about what documents you need to re-enter the country. Once your card is issued, you should not stay outside of the United States for more than one year. If you do, you will lose your status as a Lawful Permanent Resident.
Children’s Issues – In the United States, children are required to have certain vaccinations before they can enroll in school. We recommend that you bring your child’s complete vaccination records with you to the United States. If your child is adopted, you have full custody as a result of a divorce, or you share custody with another parent, you should bring a copy of all applicable adoption or custodial papers from the authoritative court in your home country. You will need these papers (translated into English) for issues such as school enrollment, medical care, and eventual citizenship.
Information for New Immigrants – Please visit the USCIS web page for helpful information on moving to the United States. You can read their publication “ Welcome to the United States: A Guide for New Immigrants ” online.
Last Updated: 7 /13/2022
Contact Information
1201 Roxas Boulevard Manila, Philippines 1000
Other Links
After your interview Frequently asked questions Where to find civil documents
Interview Preparation Video
External Link
You are about to leave travel.state.gov for an external website that is not maintained by the U.S. Department of State.
Links to external websites are provided as a convenience and should not be construed as an endorsement by the U.S. Department of State of the views or products contained therein. If you wish to remain on travel.state.gov, click the "cancel" message.
You are about to visit:

How to Visit the Philippines: Visa and Entry Requirements (2023)
If you’re planning to visit the Philippines soon, you’re in luck! The Philippines is now open to FULLY VACCCINATED tourists/nationals from FROM ALL COUNTRIES . We’ve listed down the general entry and visa requirements for tourists to visit the country.
Table of Contents
General Entry Requirements to visit the Philippines for Tourists
- Passport: Your passport must be valid for at least six months beyond your planned departure date from the Philippines.
- Return or Onward Ticket: You may be required to provide proof of a return or onward ticket to your home country or another destination. This demonstrates your intention to leave the Philippines within the permitted stay.
- Have any of the following proofs of full/complete vaccination against COVID-19 recognized under existing IATF regulations: (i) World Health Organization International Certificates of Vaccination and Prophylaxis; (ii) VaxCertPH; or (iii) National/state digital certificate of the foreign government which has accepted VaxCertPH under a reciprocal arrangement (unless otherwise permitted by the IATF);
- Unvaccinated and partially vaccinated travelers need to present a laboratory-administered negative antigen test result taken within 24 hours from departure from the country of origin. They also have the option to undergo a laboratory-based antigen test upon arrival at the airport. (Note: Those who test positive for COVID-19 after testing at the airport will have to follow the quarantine procedures that will be advised by the Philippines’ Department of Health.) Unvaccinated children aged 14 and below are not required to be vaccinated, but they need to be accompanied by a parent or guardian who complies with their own entry requirements. If they are unvaccinated and traveling on their own, they need to follow the testing requirements for adults.
- Fill out the E-travel declaration card . (THIS IS FREE OF CHARGE)
- Sufficient Funds: You may be asked to show evidence of sufficient funds to cover your expenses during your stay. This is very rare but some people have been reportedly asked.
- Accommodation: Providing information about your intended accommodation in the Philippines, such as hotel reservations or a letter of invitation from a host, may also be required. (Again, this is a random incident).
Philippines Visa Requirements for Different Nationalities
Visa-free for stay up to 30 days.
Generally, most countries are allowed 30 days visa-free entry to the Philippines. If you’re from the US, UK or European countries, you already belong in this group. For further information, can check if your country is included here.
Visa-free for stay up to 14 days
If you belong to the two categories below, you are allowed visa-free stay in the Philippines for up to 14 days.
1. Holders of Hong Kong Special Administrative (SAR) passports.
2. Holders of Macau Special Administrative Region (SAR) passports.
Visa-free for 7 days
If you are a Chinese national travelling for tourism and has a valid American, Japanese, Australian, Canadian or Schengen (AJACS) permanent residence or visa, you are allowed a visa-free stay for up to 7 days. (NOTE: not applicable for business travelers)
If you are not included in the above requirements, you can check further here for information on visa application to the Philippines.
Philippines Tourist Visa Extension
If you are a foreign national from one of the visa-free countries who wish to stay in the Philippines for more than 30 days, you can request an extended stay at the Bureau of Immigration upon arrival in the Philippines. For updated and specific information on how to get a Philippines Visa extension, check this website.
Meanwhile, read on our article of How to Plan Your trip to the Philippines and the top 20 best places you need to visit when you are here!
Did we miss anything else? Let us know in the comments!
Have you got any questions about traveling to the Philippines? Join our Philippines Travel Planning FB Page to get your answers.
Don’t know how to start planning your Philippines trip? You can start here .

Angie is a travel consultant and blogger who has started by writing her travel memoirs on her blog and then got published on international travel sites. She’s now focused on creating in-depth travel itinerary and articles about planning trips to the Philippines.
You Might Also Like
10 Best Affordable Hotels in Tagbilaran City Bohol
Ultimate 7 Best Things to Do in Boracay
When is the Best Time to Visit the Philippines?
Leave a reply cancel reply.
Save my name, email, and website in this browser for the next time I comment.
- Start Planning
- TRAVEL GUIDES
- Destinations

- Work With Me
- Philippines
- South Korea
- Netherlands
- South Africa
- New Zealand
- #diveGalapagos
- #diveIndonesia
- #diveJordan
- #diveMaldives
- Resort Review
- LiveonBoard
Select Page
US Visa for Filipinos, First Time Applicant 2023
Posted by wanderlass | Apr 19, 2023 | USA , visa challenge |

US Tourist Visa is one of the most desired visa of Filipinos, maybe the world. It’s not easy to acquire because of the US Gov’s general paranoia, but I love it that they may grant you 10-year multiple-entry visa. I got my 10 year multiple visa in 2009 and was useful during my 2011 trip around the world as it allowed me a lot of flexibility. It also let me instantly confirm an invitation to Visit Guam in 2017 .
This blog post on first time application of US Tourist visa for Filipinos will follow my dad’s application. If you are looking to renew your US VISA via dropb ox , I’ve written a post dedicated to that.
Note that this blog post will only be about US Tourist Visa (B-1/B-2) Application .
The official US VISA website is actually very comprehensive, but it does deal with several types of visa, so it can be confusing. My blog post will streamline the process focusing only on the application of US Tourist Visa , otherwise known as the B-1/B-2 type visa .
If you require visa for working, studying, marrying, transit etc, please check out the official US VISA APPLICATION website for the respective requirements.
US Visa B-1/B-2 for Tourists Criteria
The B-1/B-2 visitors visa is for people traveling to the United States temporarily for business (B-1) or for pleasure or medical treatment (B-2)
• B-1 visa is for attending business conventions and educational conferences • B-2 visa is for tourism, visiting friends or relatives, medical treatment
To be granted a US tourist visa, you must be able to prove that
• your visit is only temporary • you have enough money to cover all your expenses during your stay • you have binding ties that ensure your return to your country
4 Steps in Applying US Visa Online
Step 1 – fill up ds-160 form.
Complete the Nonimmigrant Visa Electronic Application (DS-160) form. It’s an easy form you can finish in 30minutes or less. You’ll be asked to enter personal information, address and telephone, passport details, US travel plans, travel companions, previous US travel, US contact, immediate family, work and education, and last but not the least, 5 pages of Security questions, which hopefully you can honestly answer NO to all of them.
The confirmation number generated after filling up the form is needed to set up appointment. To start filling up your own form, click this link –> DS-160 Form


Step 2 – Pay Visa Application Fee $160
Visa Fee is the Philippine peso equivalent of $160. It is non-refundable & non-transferable. US Visa Fee can be paid thru BPI online for BPI customers, Bancnet online for Bancnet customers, or Cash at BPI branches in the Philippines.
How to Pay US Visa Application Fee?
There are 2 ways to pay US Visa Application Fee: (1) Online via BPI website or Bancnet website (2) Directly at the BPI Bank Branches.
Online Payment via BPI or Bancnet
For online payment, generate a unique receipt number and follow instruction on how to go about setting up online payment <here> . You must enter this reference number when making the online payment. This number will also be serve as your receipt number in booking the appointment.

I used this option because you don’t have to line up at the bank and can do it any time of the day, but it can be a confusing. There is a 24H waiting time when your payment is posted.
Paying directly at BPI branches
This is technically a simpler option except NOT all branches accept payment and BPI is the Philippine bank with the worse service. Before going to the bank, you have to print a receipt which you need to bring with you when you pay. If you are applying for B1/B2 visa, this is the link –> Deposit Slip 160$ MRV Fee
Key points to remember:
- Unique Receipt Number – every time you click on that link, it generates a unique receipt number (see photo below). It means that if 2 or more people are applying visas together, you need to generate 2; one for each applicant. You cannot just print one and photocopy.
- This number is important throughout your application.
- This paper has expiration date (5 days) as to when you should make the payment using this deposit slip. If it expires, just generate a new one. You just don’t want to go to the bank and found your paper already expired. BPI is one of the lousiest bank in the Philippines where in you need to live long or never get served.
- After making the payment, guard it with your life. If you lose the payment receipt, you may have to pay again .

Step 3 – Book an Appointment Online
First you must create a profile on this Apply US Visa site. After filling up the DS-160 Form (step1) and making payment (step2), you can schedule your appointment on that site. The following info is needed to schedule your appointment:
- Your passport number
- Your MRV ( Machines Readable Visa ) fee payment receipt number (see photo above, highlighted in neon green is the number you needed.
- The ten (10) digit barcode number from your DS-160 confirmation page
Step 4 – Go to US Embassy
Visit the U.S. Embassy on the date and time of your visa interview. In the Philippines, there is no exception for children or senior over 80 like other countries (Japan, India). Every applicant needs to show up for the US Visa interview. But seniors or PWD can bring caregiver or kasama.
VERY IMPORTANT!!! You will need to bring the following with you
- Printed copy of your appointment letter
- Printed copy of DS-160 confirmation page ( photo )
- one recent photograph 2″x 2″ (white background, facing front)
- your current passport and all available old passports
- your supporting documents*
- US$160 visa application fee receipt – just bring it
- YOU DO NOT need to submit the application form at the time of the interview. They are so serious about this instruction so don’t even try.
DO NOT BRING – NOT ALLOWED inside the U.S. Embassy:
- battery-operated or electronic devices such as mobile phones, digital diaries, digital watches (APPLE WATCH NO!), pagers, cameras, audio/video cassettes, compact discs, MP3s, floppy disks, laptops, or portable music players
- large shoulder bags/purses – only bags that can be carried by hand will be permitted
- bags such as travel bags, backpacks, briefcases, suitcases, leather, cloth bags, and zip folders – you can only carry plastic bags containing application related papers
- food items (refreshments are available for purchase in the waiting area)
- sealed envelopes or packages
- cigarettes, cigars, match boxes, lighters
- sharp objects such as scissors, pen knives or nail files
- weapons or explosive materials of any kind (ha ha)
- Other items may be prohibited at the discretion of security staff.
Once you enter the embassy, you will find that there are many many staff to guide you every step of the way. It is impossible to get lost!
What do they ask during the interview at the U.S. Embassy?
This year I’ve accompanied my father, my father’s nurse, and my aunt and they were all granted visa. First question is always what’s the purpose of your travel? They have a copy of the application form (DS-160) you filled up online so they will ask you about that. In our case, seeing my father on a wheelchair, the officer asked me when was the last trip my father took.
B1 Domestic/Personal Employee Applicant
For 10 years now, my family travels with Eva, my dad’s caregiver. I’ve previously applied visa for her to China, Japan, Korea. I applied US Visa for her the same process as for my dad, not knowing that there’s a special category Visa for B1 employees (Yaya, Caregivers, Secretary, etc.) who will need their visas attached to yours. Step 1 & 2 above is the same. The difference will start at Step 3 when you schedule her for interview. You have to choose Domestic Employee
Domestic Employees schedule is at 7:30am. Business/Tourism is scheduled from 9:00am. So it means you can still go on the same day, but not go in the same time. In that case, both will have a long wait. I don’t know why they can’t do it the same time. It is recommendable for the employer to accompany the domestic employee applicant.

US Visa B-1/B-2 Result
You will immediately find out if you are granted your US Visa. You leave your passport with them and have the option to pick up your passport the next day or having it home delivered by courier, which you don’t have to pay extra

Embassy of the United States, Manila 1201 Roxas Blvd, Ermita, Manila, 1000 Metro Manila Telephone: (02)301-2000 Twitter: @USEmbassyPH
About The Author
Lilliane is the lass who wanders. She travels the world on a quest to live a life not ordinary. An avid traveler, photographer, and scuba diver, she once traveled continuously for 14 months around the world, took over 20,000 photos, and spent too much money on a liveaboard dive trip in the Galapagos.
Related Posts

How to Apply Visa to Romania for Philippine Passport Holders

Diving Guam Wrecks

Apply Egyptian Tourist Visa in the Philippines 2023

South Africa Visa for Philippine Passport Holders
Hi, Ms. wanderlass, I have a question on the B1 Domestic/Personal Employee Applicant, what are the docs that you passed or requirements for that? Is it possible that I could get a visa if I accompany my us citizen cousin who has a disability to travel with her to US? She is been under my care for about 10 years now also while her mom is in US, but since she is my cousin it is not like we have a formal employee-employer thing with her mom, only that my Aunt gave me a monthly allowance for that. We would like to bring my cousin back to US but she already used to me so her mom wants me to bring also to take care of her daughter while in there. Could it be possible I could apply for the B1 visa so I could be with her in US? What are the terms and docs so my Aunt say she employed me? Does the B1 is appropriate to apply for a visa in my case or we would end up considering to apply for just a tourist visa for that?
Hoping for your answer and thoughts. Thank you so much! :)
If you have passbook or bank statements, it will be helpful to bring them. But they normally don’t ask for it. No need for hotel reservations. But if you do have them, you can bring them just in case it was asked.
welcome your thoughts Cancel reply
This site uses Akismet to reduce spam. Learn how your comment data is processed .
The lass who wanders

I travel the world on a quest to live a life not ordinary!
KNOW MORE ON MEDIA SAY HELLO!

Wanderlass Newsletter
to receive the latest news and updates
You have Successfully Subscribed!
Pin it on pinterest.
- Print Friendly

Select Your Language
Select your currency.
- AED United Arab Emirates Dirham
- AFN Afghan Afghani
- ALL Albanian Lek
- AMD Armenian Dram
- ANG Netherlands Antillean Guilder
- AOA Angolan Kwanza
- ARS Argentine Peso
- AUD Australian Dollar
- AWG Aruban Florin
- AZN Azerbaijani Manat
- BAM Bosnia-Herzegovina Convertible Mark
- BBD Barbadian Dollar
- BDT Bangladeshi Taka
- BGN Bulgarian Lev
- BIF Burundian Franc
- BMD Bermudan Dollar
- BND Brunei Dollar
- BOB Bolivian Boliviano
- BRL Brazilian Real
- BSD Bahamian Dollar
- BWP Botswanan Pula
- BZD Belize Dollar
- CAD Canadian Dollar
- CDF Congolese Franc
- CHF Swiss Franc
- CLP Chilean Peso
- CNY Chinese Yuan
- COP Colombian Peso
- CRC Costa Rican Colón
- CVE Cape Verdean Escudo
- CZK Czech Republic Koruna
- DJF Djiboutian Franc
- DKK Danish Krone
- DOP Dominican Peso
- DZD Algerian Dinar
- EGP Egyptian Pound
- ETB Ethiopian Birr
- FJD Fijian Dollar
- FKP Falkland Islands Pound
- GBP British Pound Sterling
- GEL Georgian Lari
- GIP Gibraltar Pound
- GMD Gambian Dalasi
- GNF Guinean Franc
- GTQ Guatemalan Quetzal
- GYD Guyanaese Dollar
- HKD Hong Kong Dollar
- HNL Honduran Lempira
- HTG Haitian Gourde
- HUF Hungarian Forint
- IDR Indonesian Rupiah
- ILS Israeli New Sheqel
- INR Indian Rupee
- ISK Icelandic Króna
- JMD Jamaican Dollar
- JPY Japanese Yen
- KES Kenyan Shilling
- KGS Kyrgystani Som
- KHR Cambodian Riel
- KMF Comorian Franc
- KRW South Korean Won
- KYD Cayman Islands Dollar
- KZT Kazakhstani Tenge
- LAK Laotian Kip
- LBP Lebanese Pound
- LKR Sri Lankan Rupee
- LRD Liberian Dollar
- LSL Lesotho Loti
- MAD Moroccan Dirham
- MDL Moldovan Leu
- MGA Malagasy Ariary
- MKD Macedonian Denar
- MNT Mongolian Tugrik
- MOP Macanese Pataca
- MUR Mauritian Rupee
- MVR Maldivian Rufiyaa
- MWK Malawian Kwacha
- MXN Mexican Peso
- MYR Malaysian Ringgit
- MZN Mozambican Metical
- NAD Namibian Dollar
- NGN Nigerian Naira
- NIO Nicaraguan Córdoba
- NOK Norwegian Krone
- NPR Nepalese Rupee
- NZD New Zealand Dollar
- OMR Omani Rial
- PAB Panamanian Balboa
- PEN Peruvian Nuevo Sol
- PGK Papua New Guinean Kina
- PHP Philippine Peso
- PKR Pakistani Rupee
- PLN Polish Zloty
- PYG Paraguayan Guarani
- QAR Qatari Rial
- RON Romanian Leu
- RSD Serbian Dinar
- RUB Russian Ruble
- RWF Rwandan Franc
- SAR Saudi Riyal
- SBD Solomon Islands Dollar
- SCR Seychellois Rupee
- SEK Swedish Krona
- SGD Singapore Dollar
- SHP Saint Helena Pound
- SLL Sierra Leonean Leone
- SOS Somali Shilling
- SRD Surinamese Dollar
- SVC Salvadoran Colón
- SZL Swazi Lilangeni
- THB Thai Baht
- TJS Tajikistani Somoni
- TOP Tongan Pa anga
- TRY Turkish Lira
- TTD Trinidad and Tobago Dollar
- TWD New Taiwan Dollar
- TZS Tanzanian Shilling
- UAH Ukrainian Hryvnia
- UGX Ugandan Shilling
- USD United States Dollar
- UYU Uruguayan Peso
- UZS Uzbekistan Som
- VND Vietnamese Dong
- VUV Vanuatu Vatu
- WST Samoan Tala
- XAF CFA Franc BEAC
- XCD East Caribbean Dollar
- XOF CFA Franc BCEAO
- XPF CFP Franc
- YER Yemeni Rial
- ZAR South African Rand
- ZMW Zambian Kwacha
US Tourist Visa for the citizens of the Philippines
Citizens of the Philippines who plan to travel to the United States for tourism purposes need to apply for a US visa. As a Filipino, you are neither visa-exempt nor part of the Visa Waiver Program, you need to apply for a US B1/B2 Visa .

You can apply for your American B1/B2 Visa with us and enjoy the benefits of our professional services while improving your chances of visa approval.
What is the B1/B2 Visa?
The B1/B2 visa is a type of non-immigrant visa issued by the United States to foreign nationals seeking temporary entry into the country. The visa is commonly used for business and tourism purposes.
- B1 visa category: This is intended for business-related activities such as attending conferences, business meetings, or consultations. Holders of this visa cannot engage in paid work or employment in the U.S.
- B2 visa category: This is designed for tourists, people visiting for medical treatment, or those participating in amateur events or contests where they won't be paid. It is also used by people visiting friends or relatives in the U.S.
Validity of the US B1/B2 Visa
The visa is valid for 10 years and allows for multiple entries. Usually allowing a maximum stay of six months (180 days) at a time.
What are the requirements to apply for the B1B2 Visa?
It's easy to apply for a B1/B2 American visa by completing the list below.
Valid passport – A passport that is valid for at least another 6 months from the intended date of departure from the US.
Passport photo – Along with the application form, you need to upload a photograph of yourself. It needs to be as recent as possible and to follow passport photo regulations.
E-mail address – Once you complete the application, we will send you the confirmation page via e-mail. You will have to print it out before you go to your interview.
Means of payment – You will have to pay the fee for the B1/B2 visa, service fees apply.
Other documents like proof of return or onward travel, travel insurance, a support letter, and financial proof could be necessary, depending on your case. We will send you a complete list of the documents you need to present during your interview.
Where can I apply for the B1B2 Visa?
You can apply with us on our website or using our mobile app , or you can apply directly with your nearest US Embassy or Consulate .
Applying with us
You only have to follow these easy steps to get your B1/B2 visa with us:
1. Fill out the online simplified application with the guidance of our electronic manual.
2. Get unlimited support during the entire process from our team of iVisa Experts, who will help you apply correctly. 3. Send all the required documents to the Embassy or Consulate and attend the Visa Interview if needed.
Receive your new visa and get ready to travel!
I have more questions, who can I speak to?
To learn more about the US Tourist Visa for the citizens of the Philippines, you can contact our team of experts via chat or WhatsApp .
Related Articles

- Latest News
- Emergencies
- Ask the Law
- GN Fun Drive
- Visa+Immigration
- Phone+Internet
- Reader Queries
- Safety+Security
- Banking & Insurance
- Dubai Airshow
- Corporate Tax
- Top Destinations
- Corporate News
- Electronics
- Home and Kitchen
- Consumables
- Saving and Investment
- Budget Living
- Expert Columns
- Community Tips
- Cryptocurrency
- Cooking and Cuisines
- Guide to Cooking
- Art & People
- Friday Partner
- Daily Crossword
- Word Search
- Philippines
- Australia-New Zealand
- Corrections
- Special Reports
- Pregnancy & Baby
- Learning & Play
- Child Health
- For Mums & Dads
- UAE Success Stories
- Live the Luxury
- Culture and History
- Staying Connected
- Entertainment
- Live Scores
- Point Table
- Top Scorers
- Photos & Videos
- Course Reviews
- Learn to Play
- South Indian
- Arab Celebs
- Health+Fitness
- Gitex Global 2023
- Best Of Bollywood
- Special Features
- Investing in the Future
- Know Plan Go
- Gratuity Calculator
- Notifications
- Prayer Times
UAE residents enjoy visa-free entry to nine destinations
Travel & tourism.
Ease and accessibility makes these countries perfect for spontaneous travelers

Dubai: For UAE residents, the world just got a little smaller. Nine countries now welcome UAE residents with a visa on arrival, eliminating the complexities of pre-entry visa applications.
The accessible destinations for UAE residents sans pre-entry visa requirements are: Georgia, Maldives, Azerbaijan, Armenia, Montenegro, Seychelles, Malaysia, Indonesia, and Nepal.
Get exclusive content with Gulf News WhatsApp channel
Travelers from the UAE must ensure they carry essential documents before departure, including a passport valid for at least six months, a valid UAE residency visa, confirmed reservations at their destination, and adequate funds to support their travel expenses.
- Europe's summer tourist rush: Know the top 10 busiest cities
- Credit cards offer to save you from all your travel troubles: What you may not know
- Arrived in a new country? Don’t use ATMs there without knowing these risks
- 6 trends that will change the way you travel this summer
Such a combination of ease and accessibility makes these countries perfect for spontaneous travelers looking to explore new cultures and experiences with minimal preparatory hassle.
1. Georgia - Known for its rich cultural heritage, the country offers 90-180 days visa-free travel for UAE residents. Visitors are required to present a valid residence, a passport with at least 6 months' validity, hotel reservations, and proof of sufficient funds.
2. Maldives - A paradise with stunning beaches and clear waters, the Maldives offers a 30-day free visa on arrival, which can be extended for a fee. Travelers must submit a health declaration 48 hours before travel and provide documents including a passport valid for at least one month post-departure, hotel reservation proof, return flight tickets, and evidence of sufficient funds.
3. Azerbaijan - This country blends unique history and picturesque landscapes. A visa can be obtained on arrival for a fee of Dh 92. Required documents include a valid passport, a copy of the UAE residence visa, proof of hotel and flight reservations, and two recent passport photos.

4. Armenia - Offers a visa-free entry for UAE nationals, while residents must present a UAE residence permit upon arrival.
5. Montenegro - Known for its natural beauty and cultural heritage. UAE nationals enter without a visa, and residents can obtain a visa on arrival. Necessary documents include a passport valid for 6 months, UAE residency, health insurance, confirmed return tickets, and hotel reservations.
6. Seychelles - Famous for its luxury resorts and tropical forests, offers visa on arrival for UAE residents. Required documents include a valid passport, UAE residency, return ticket, confirmed hotel booking, and sufficient travel funds.
7. Malaysia - Known for its rainforests and cityscapes, allows UAE residents to visit for up to 90 days without an eVisa. Required documents include the original passport, return ticket, and proof of residence reservation.
8. Indonesia - Offers natural beauty from the beaches of Bali to the rainforests of Sumatra. UAE residents can obtain a visa on arrival with proper travel documents including original passport, UAE residency, return tickets, and residence confirmation.
9. Nepal - Offers breathtaking landscapes and rich cultural heritage. UAE residents receive a visa on arrival, needing an original valid passport and proof of travel and residency reservations.
More From Tourism
Renting a car abroad? Mind these costly risks
Barcelona to ban all tourist short-term rentals by 2029
Delhi airport launches fast-track immigration clearance

Dubai is the airport of the world, says Sheikh Mohammed

Saudi launches renewable energy geographic survey

Arabian Mills lists 30 per cent stake on Tadawul
HSBC launches new global wealth trading platform in UAE
UAE residents enjoy visa-free entry to 9 destinations
UAE grocer Spinneys opens first store in Saudi Arabia
CT drives financial accountability in SME sector
Uae businesses find they have more options on new hires, nvidia's shares surge over 5% after $430b market slump, uae mediation helps free 180 russia, ukraine prisoners, four people arrested at uk pm sunak's home, visa, mastercard $30b swipe-fee deal blocked by judge.

Get Breaking News Alerts From Gulf News
We’ll send you latest news updates through the day. You can manage them any time by clicking on the notification icon.
Baguhin ang Wika: Change to Tagalog
Apply for a U.S. Visa
In the philippines.
Important Notice! Insert Message Here
- Bank and Payment Options/Pay My Visa Fee
- DS-160 Information
- Appointment Wait Times
- Photos and Fingerprints
- Visa Waiver Program
- Security Regulations
- Apply for a Visa
Ages below 14 and over 79
- Renew My Visa
- Complete My DS-160
- Schedule My Appointment
- Change Document Delivery Address
- Retrieve My Passport/Visa
- Apply for an Expedited Appointment
- Application Refused Under INA 221(g)
- Visa Information
- Check My Petition Status
- Visa Wait Times
- Select Document Delivery Address
- Travel Coordinator
- Priority Interview Program
- Crew and Manning Program
- Group Appointments
- Diplomatic and Government Officials
- Visas for Children
- U.S. Embassy, Manila
- Passport/Visa Collection Locations
- Document Drop-Off Locations
- Bank Locations
- Holidays and Closures
- Helpful Links
You are here: Home / Ages below 14 and over79
On this page:
- Qualification s
- How To Apply
Applicants under 14 years old and over 79 years old generally do not have to appear in person at the U.S. Embassy for the visa interview or when renewing their visa.
Qualifications
Under 14 years old - To qualify for personal appearance exemption, either or both parents of the applicant must have a valid B1/B2 visa, and the applicant must be physically present in the Philippines at the time of the application.
Above 79 years old - Follow the interview waiver application process (Steps 1 to 5). at https://ustraveldocs.com/ph/ph-niv-visarenew.asp .
How to Apply
Pay the visa application fee. http://www.ustraveldocs.com/ph/ph-niv-paymentinfo.asp.
Step 2
Complete the Nonimmigrant Visa Electronic Application (DS-160) form . After completing the form, print and save your confirmation page.
Register an account on https://cgifederal.secure.force.com/SiteRegister?country=Philippines&language=en_US
Additional requirements for applicants under 14 years old:
- Original Birth Certificate issued by Philippine Statistics Authority (PSA);
- Photocopy of valid B1/B2 U.S. visa of either or both parents.
If you qualify for Interview exemption, you will receive an confirmation letter containing a document checklist. Print two copies of the letter (one for your records and the other to be submitted with your application). Drop off your passport along with the listed documents mentioned on the Confirmation letter at any of the 99 LBC branches - click here . Please remember to include the following:
- Confirmation Letter;
- Current and old passport with previous B1/B2 visa;
- Two (2) photos, size 2”x2” inch on glossy paper, in color, in white background, unretouched, taken within the last six (6) months, in neutral facial expression, and with both eyebrows and ears exposed. Photo guidelines can be accessed at http://www.ustraveldocs.com/ph/ph-niv-photoinfo.asp. PLEASE DO NOT SUBMIT THE SAME PHOTOGRAPH THAT APPEARED ON YOUR PREVIOUS VISA. Failure to submit a valid photograph will delay the processing of your visa application.
Please be sure that all of the above items are included in your Interview Waiver application. Failure to include all requested items – including a new photo and DS-160 application - will result in returning your application via courier.
Step 4
Please submit your documents at any of the 99 LBC branches. For list of LBC branches and outlets, please click here.
Step 5
If your application is approved, your passport and visa will be delivered to the address you provided on your Atlas profile.
Please Note: Using the exemption process does not guarantee visa issuance. In some cases, you may be required to appear for a visa interview at the U.S. Embassy. If you submit an incomplete and/or inaccurate application, or if you do not meet the criteria listed above, we will return your application via the courier, and you will be asked to schedule an interview. You should submit your application well in advance of your planned travel, to allow for the possibility that a visa interview will be necessary.
© CGI Federal Inc.
- NIV Information
- Bank and Payment Options
- NIV Application
- Pay My Visa Fee
- Immigrant Visas
- Local Visa Programs
- General Information

IMAGES
VIDEO
COMMENTS
A citizen of a foreign country who seeks to enter the United States generally must first obtain a U.S. visa, which is placed in the traveler's passport. Certain international travelers may be eligible to travel to the United States without a visa under the Visa Waiver Program, which is administered by the Department of Homeland Security (DHS) .
Select here to learn more about an important update on waivers of the interview requirements of certain nonimmigrant visa applicants. All receipts for payment of Machine-Readable Visa (MRV) fees issued before October 1, 2022, expired September 30, 2023 ... 2023 to avoid paying a new fee. If you paid the MRV fee on or after October 1, 2022, you ...
Call the U.S. Embassy Manila's Visa Information and Appointment Service at (+632) 8548-8223 or (+632) 7792-8988 to schedule your appointment. Nonimmigrant Visas. The Embassy prioritizes travelers with urgent (i.e., matter of life or death) travel needs and certain critical categories of travelers, such as students and exchange visitors (F-1 ...
Step 2: Pay the Visa Application Fee. Next step is to pay the U.S. visa application fee in the Philippines. The cost of your visa application depends on the type of visa you're applying for. For non-immigrant and visitor visas, the fee is about US$185. While it's listed in dollars, you must pay it in Philippine Peso.
Requirements. By U.S. Embassy Manila. 2 MINUTE READ. January 1, 2022. A valid U.S. passport; Completed application form; One (1) passport-size photo signed at the back by the applicant. If the applicant is a minor (still unable to sign) the photograph must be signed at the back by either parent after first printing the minor's name; Photocopy ...
Meanwhile, the most expensive US visas are the K visa (Fiancé (e) or Spouse of US Citizen) and the E visa (Treaty Trader/Investor) with application fees amounting to $265 and $205, respectively. To pay the US visa application fee, you can choose from two modes of payment: Over-the-counter or online transactions.
Filing Form DS-160. The first step in the travel visa process for every Filipino applicant is filing Form DS-160 (Online Nonimmigrant Visa Application). Form DS-160, filed online, requests basic information about the applicant's life in the Philippines, their intended trip to the U.S., and any past immigration history.
Each applicant - including children - must have their own Form DS-160 visa application. The Form DS-160 must be completed and submitted online prior to your interview at the Embassy or Consulate. The barcode number on the Form DS-160 confirmation page is required in order to book your interview. The Form DS-160 must be submitted online and the ...
As you go through the process you will be able to select your visa type, enter personal data, add dependents, select your document delivery location, confirm visa payment and finally, schedule your appointment. Step 5. Visit the U.S. Embassy on the date and time of your visa interview.
The U.S. Embassy in Manila requires a CENOMAR for applicants whose unmarried status is important to their visa category. This includes visa categories K1, CR1/IR1, CR2/IR2, F1, F2A, F2B, and derivative children for any visa category, if the visa applicant is 18 years of age or older. Please ensure that the correct information is on the CENOMAR ...
General Entry Requirements to visit the Philippines for Tourists. Passport: Your passport must be valid for at least six months beyond your planned departure date from the Philippines. Return or Onward Ticket: You may be required to provide proof of a return or onward ticket to your home country or another destination.
Documents required for USA Tourist Visa from Philippines include passport and other supporting documents. A total of 11 documents are required. Visa Application Form: Completed application form for USA. Visa Application. Passport Photo: A Passport Photo is required. Photo must be no older than 6 months.
U.S. Embassy Manila, Philippines. U.S. Consular Agency Cebu, Philippines June 8, 2022 Message for U.S. Citizens: Philippine Entry and Exit Requirements Entry to the Philippines: Although travel to the Philippines is now permitted, U.S. citizens should know and comply with arrival and departure requirements as promulgated by the Philippine government, which generally include the following as a ...
3. Fill out the DS-160 form online. Source: Unsplash. Hop online and fill out the DS-160 form, which is specifically designed for non-immigrant visa applicants. This is the appropriate form for a B1/B2 US Visa application. And don't worry, the form is clear and straightforward.
Pay the application fee: The next step is to pay the non-refundable application fee, which can be paid online via PesoNet or in person through RCBC. The current application fee for a US tourist visa is now $185 (as of 17 June 2023). You will pay in Php equivalent to around Php10,700. You visit this link for a detailed payment guideline.
The price for a Philippines tourist visa varies depending on the type of visa, the duration of stay, and the applicant's nationality. According to some sources, the prices of Philippines tourist visas are as follows. single-entry Philippines Tourist visa with a validity is 3 months: 30 USD; multiple-entry Philippines Tourist visa with a ...
Visa applicants, including children, are required to pay a non-refundable, non-transferable visa application fee, sometimes referred to as the MRV fee, before applying for a nonimmigrant visa. ... 2022, were extended until September 30, 2023, and remain valid until this date. Remember: Applicants are limited to the number of times they can ...
Step 2 - Pay Visa Application Fee $160. Visa Fee is the Philippine peso equivalent of $160. It is non-refundable & non-transferable. US Visa Fee can be paid thru BPI online for BPI customers, Bancnet online for Bancnet customers, or Cash at BPI branches in the Philippines.
Funds of US$10,000 or more must be declared. Non-Residents. Tobacco and alcohol may only be imported by travellers 21 years and over. Tobacco limit. 200 cigarettes; 100 cigars. Bringing alcohol. 1 litre of alcohol. Other Goods. Visitors travelling to the US for over 72 hours have an allowance of up to US$100 of dutiable items intended as gifts ...
Citizens of the Philippines who plan to travel to the United States for tourism purposes need to apply for a US visa. As a Filipino, you are neither visa-exempt nor part of the Visa Waiver Program, you need to apply for a US B1/B2 Visa. You can apply for your American B1/B2 Visa with us and enjoy the benefits of our professional services while ...
Romanians Could Soon Travel to the US Visa-Free 07.12.2023 French Investors Now Eligible for 4-Year US Visa 29.11.2023 9 EU Countries Among Top 20 Choices for Young Americans Wanting to Move Out of the US 24.11.2023
Georgia - Known for its rich cultural heritage, the country offers 90-180 days visa-free travel for UAE residents. Visitors are required to present a valid residence, a passport with at least 6 ...
You can travel to the United States with your expired passport containing a valid visa and your new, valid passport. Qualifications. Please see the link below for the application process and requirements: Renew My Visa (B1/B2) Renew My Visa (C1/D) MAAP. Renew My Visa (FMJ) Renew My Visa (HLOPQ)
Tourism Secretary Christina Frasco (PNA photo by Joyce Rocamora). MANILA - The Department of Tourism (DOT) will "recalibrate" its efforts to further increase tourist arrivals from other source markets, including South Korea, the United States and Japan.. Tourism Secretary Christina Frasco made the statement Friday after admitting that the additional visa requirements for Chinese ...
South Korea will soon launch a new visa for foreign nationals who dream of training like a K-pop idol, in a bid to boost its tourism industry back to pre-pandemic levels. The "K-Culture Training ...
Applicants under 14 years old and over 79 years old generally do not have to appear in person at the U.S. Embassy for the visa interview or when renewing their visa. Qualifications Under 14 years old - To qualify for personal appearance exemption, either or both parents of the applicant must have a valid B1/B2 visa, and the applicant must be ...
Taiwan authorities increased law enforcement efforts. The Human Trafficking Prevention and Control Act (HTPCA), as amended, criminalized sex trafficking and labor trafficking and prescribed penalties of up to seven years' imprisonment and fines up to 5 million new Taiwan dollars (NT) ($163,180); these penalties were sufficiently stringent and, with respect to sex trafficking, commensurate ...